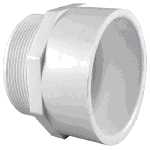
Take the male adapter and cut off the threaded part with a hacksaw and sand down the raw edge.
That is the part that sits on top of the ball so you don't have to be super careful. You then want to take your Dremel and, using your sanders, widen the hole at the ball end until the ball will nestle in there correctly.
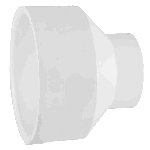
Take the reducing coupling and a hack saw and cut off most of the bottom edge.

You may need to widen the bottom edge (the edge that you cut) so that the reducing coupling will fit in there neatly (mine did not but again, YMMV). You can do that with your Dremel. You may need to glue the two pieces together so use the rubber cement.

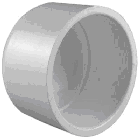
Take the socket cap and cut the cap with a hacksaw where the cap starts rounding into the actual cap part. This is the vast majority of the cap. Once that is cut, you need to fit it inside the reducing coupling top. You will need to sand down the inside of the reducing coupling and the outside of the cap.
Once the pieces fit, you need to drill a hole in the top of the cap wide enough for your electrical wire and the handle to fit through. I think, don't quote me on this, we used a 3/16'' but I honestly don't remember.
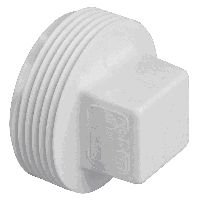
Next, take your cleanout plug and hacksaw and cut a line halfway into the box part so you are left with just the box. This is the base of the hive.

Spray paint everything black. Paint a green line (or get something else that glows) on the top edge of the reducing coupling. Let all the paint and plasti dip cure for two days.
|